Доброй ночи, дорогие друзья! ✨
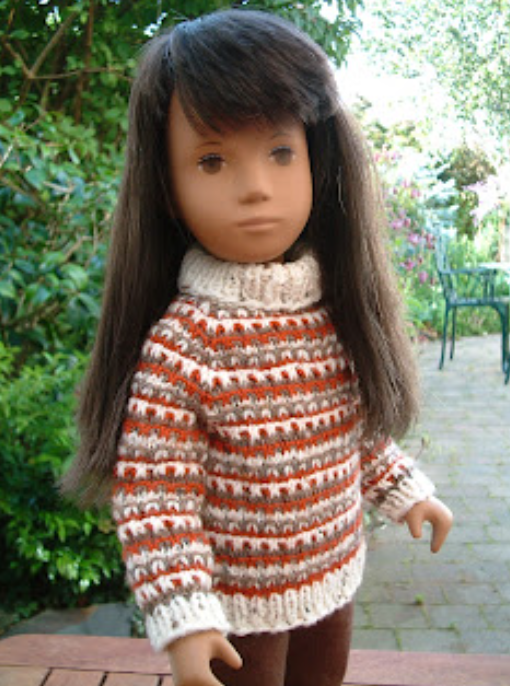
Я к вам с очередной находкой из интернета — на этот раз это потрясающий мастер‑класс по вязанию стильного свитера для куклы. К сожалению, оригинал на иностранном языке, но не стоит расстраиваться.
Что вас ждёт в этом МК:
- элегантный фасон свитера, который подойдёт для кукол разных размеров;
- интересные узоры и фактуры — изделие получится очень стильным;
- техника вязания, которую можно адаптировать под разные виды пряжи;
- пошаговое описание процесса с моими комментариями и подсказками.
Почему стоит попробовать:
- это отличная возможность расширить свой арсенал вязальных техник;
- свитер станет изюминкой кукольного гардероба — можно сочетать с разными нарядами;
- работа не слишком сложная, но результат выглядит профессионально;
- вы получите удовольствие от процесса и гордость за готовое изделие.
Что понадобится:
- тонкая пряжа подходящего цвета (рекомендуемый метраж: 300–400 м/100 г);
- спицы № 2,0–2,5 (в зависимости от выбранной пряжи);
- маркеры для петель;
- игла для сшивания деталей;
- ножницы.
Давайте вместе разберём этот иностранный МК и свяжем чудесный свитер для куколки! Буду рада ответить на ваши вопросы в комментариях — делитесь своими успехами и фото готовых работ! 📸❤️
Приятных сновидений и творческих успехов! Пусть вязание приносит радость даже ночью! 🧶✨
- #вязаниедлякукол
- #свитердлякуклы
- #мастерклассповязанию
- #МКповязанию
- #вязаниеспицами
- #рукоделие
- #handmade
- #кукольнаяодежда
- #нарядыдлякукол
- #одеждадлякукол
- #гардеробкуклы
- #стильдлякуклы
- #обучениевязанию
- #советыповязанию
- #переводМК
- #разбираемМК
- #вязаниедляначинающих
- #схемывязания
- #творчество
- #своимируками
- #DIY
- #сделаносвоимируками
- #идеидлявязания
- #вдохновениедлявязания
- #узорыдлявязания
- #миниатюрноевязание
- #вязаниекакхобби
- #творюсдушой
Materials:
Main colour – 4 ply yarn (MC)
Contrast colour A – 4 ply yarn (A)
Contrast colour B – 4 ply yarn (B)
3 mm set of 5 dp needles
3.25mm set of 5 dp needles
2 stitch holders
Gauge: 7 sts and 9 rows = 1 inch (2.5 cm) over swatch of stocking stitch using MC and 3.25 mm needles. You may need to use needles one size smaller or larger to achieve correct tension.
Abbreviations:
k Knit yb Yarn back
k2tog Knit two stitches together sl slip
p Purl inc increase
p2tog Purl two stitches together rep repeat
yf Yarn forward RS Right Side
dp Double pointed needles
st, sts Stitch, stitches
This sweater is knitted from the neck down.
Polo neck collar:
Using MC cast on 46 stitches loosely (or if you are a tight knitter using a larger sized needle can help keep the stitches loose). Divide the stitches onto four 3.25 mm dp needles, 12 sts on needle 1, 11 sts on needle 2, 12 sts on needle 3, 11 sts on needle 4.
Round 1: *K1, P1* rib, repeat to end of round.
Round 2 – 6: repeat round 1.
Round 7: change to 3 mm dp needles *K1, P1* rib, repeat to end of round.
Round 8 – 15: repeat round 7
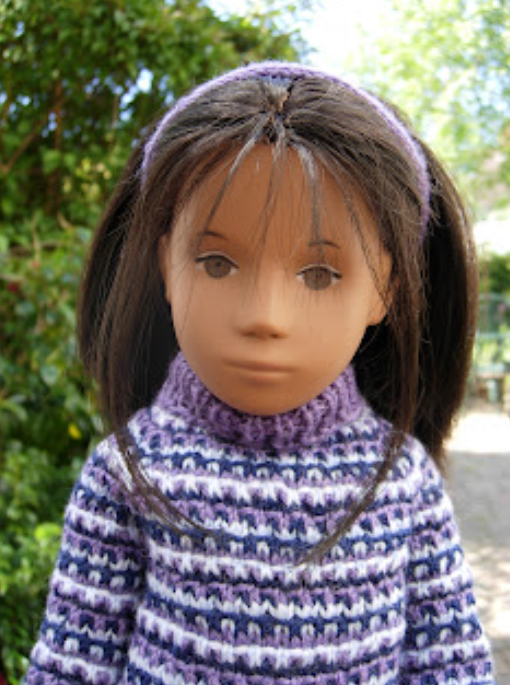
or Crew neck collar:
Using MC cast on 46 stitches loosely (or if you are a tight knitter using a larger sized needle can help keep the stitches loose). Divide the stitches onto four 3 mm dp needles, 12 sts on needle 1, 11 sts on needle 2, 12 sts on needle 3, 11 sts on needle 4.
Round 1: *K1, P1* rib, repeat to end of round.
Work another 4 rounds.
Raglan shaping:
Change to 3.25 mm dp needles.
Round 1: K4 sts onto needle 1, K19 sts onto needle 2, K4 sts onto needle 3, K19 sts onto needle 4.
Needle 1 and needle 3 work the sleeves, needle 2 and needle 4 work the front and back.
Round 2 (inc round): *k twice into first st, k to last st on needle 1, k twice into last st on needle*, rep *to* for needle 2, 3 and 4.
Round 3: Change to A, (k1, sl 1 purlwise) rep to end
Round 4: (k1, yf, sl 1 purlwise, yb) rep to end
Round 5: Change to B, k
Round 6 (inc round): rep round 2 (8 sleeve sts)
Round 7: Change to MC, (k1, sl 1 purlwise) rep to end
Round 8: (k1, yf, sl 1 purlwise, yb) rep to end
Round 9: Change to A, k
Round 10 (inc round): rep round 2 (10 sleeve sts)
Round 11: Change to B, (k1, sl 1 purlwise) rep to end
Round 12: (k1, yf, sl 1 purlwise, yb) rep to end
Round 13: Change to MC, k
Round 14 (inc round): rep round 2 (12 sleeve sts)
Next: Rep rounds 3 to 14
Then: rep rounds 3 to 8
Next slip the 20 sleeve sts off needles 1 and 3 onto st holders.
From this point stop working in the round and work front and back and sleeves flat.
It is important that the correct sts are worked for back, front, right sleeve and left sleeve as the pattern is worked slightly differently for each.
Back section (sts on needle 2):
The back section is the one with the raglan where the colour change overs were made while knitting in the round.
Using 3.25 mm needles
Row 1: Change to A, p to end, cast on 3 sts
Row 2: k to end, cast on 3 sts (41 sts)
Row 3: Change to B, (sl 1 purlwise, p1) rep to end
Row 4: (yf, sl 1 purlwise, yb, k1) rep to end
Row 5: Change to MC, p
Row 6: k
Row 7: Change to A, (p1, sl 1 purlwise) rep to end
Row 8: (k1, yf, sl 1 purlwise, yb) rep to end
Row 9: Change to B, p
Row 10: k
Row 11: Change to MC, (sl 1 purlwise, p1) rep to end
Row 12: (yf, sl 1 purlwise, yb, k1) rep to end
Row 13: Change to A, p
Row 14: k
Row 15: Change to B, (p1, sl 1 purlwise) rep to end
Row 16: (k1, yf, sl 1 purlwise, yb) rep to end
Row 17: Change to MC, p
Row 18: k
Row 19: Change to A, (sl 1 purlwise, p1) rep to end
Row 20: (yf, sl 1 purlwise, yb, k1) rep to end
Row 21: Change to B, p
Row 22: k
Row 23: Change to MC, (p1, sl 1 purlwise) rep to end
Row 24: (k1, yf, sl 1 purlwise, yb) rep to end
Row 25: Change to A, p
Row 26: k
Next: rep rows 3 to9
Welt (alike for back and front):
Change to 3 mm needles
Row 1: Change to MC, p
Row 2: (k1, p1) rib, rep to end
Row 3: (p1, k1) rib, rep to end
Next rep row 2 and row 3
Cast off in k1, p1 rib.
Front section (sts on needle 4):
Using 3.25 mm needles
Row 1: Change to A, p to end, cast on 3 sts
Row 2: k to end, cast on 3 sts (41 sts)
Row 3: Change to B, (p1, sl 1 purlwise) rep to end
Row 4: (k1, yf, sl 1 purlwise, yb) rep to end
Row 5: Change to MC, p
Row 6: k
Row 7: Change to A, (sl 1 purlwise, p1) rep to end
Row 8: (yf, sl 1 purlwise, yb, k1) rep to end
Row 9: Change to B, p
Row 10: k
Row 11: Change to MC, (p1, sl 1 purlwise) rep to end
Row 12: (k1, yf, sl 1 purlwise, yb) rep to end
Row 13: Change to A, p
Row 14: k
Row 15: Change to B, (sl 1 purlwise, p1) rep to end
Row 16: (yf, sl 1 purlwise, yb, k1) rep to end
Row 17: Change to MC, p
Row 18: k
Row 19: Change to A, (p1, sl 1 purlwise) rep to end
Row 20: (k1, yf, sl 1 purlwise, yb) rep to end
Row 21: Change to B, p
Row 22: k
Row 23: Change to MC, (sl 1 purlwise, p1) rep to end
Row 24: (yf, sl 1 purlwise, yb, k1) rep to end
Row 25: Change to A, p
Row 26: k
Next: rep rows 3 to 9
Then: work welt.
Right Sleeve:
The right sleeve is the one with the raglan where the colour change over were made while knitting in the round.
Row 1: Using A and 3.25 mm needles, with RS facing pick up and k4 sts, k20 sts from stitch holder, pick up and k4 sts
Row 2: p
Row 3: Change to B, (sl 1 purlwise, k1) rep to end
Row 4: (p1, yb, sl 1 purlwise, yf) rep to end
Row 5: Change to MC: k
Row 6: p
Row 7: Change to A, (k1, sl 1 purlwise) rep to end
Row 8: (yb, sl 1 purlwise, yf, p1) rep to end
Row 9: Change to B, k
Row 10: p
Row 11: Change to MC, (sl 1 purlwise, k1)
Row 12: (p1, yb, sl 1 purlwise, yf)
Row 13: Change to A, k
Row 14: p
Row 15: Change to B, (k1, sl 1 purlwise)
Row 16: (yb, sl 1 purlwise, yf, p1)
Row 17: Change to MC, k
Row 18: p2tog, p to last 2 sts, p2tog
Next: rep rows 7 to 17
Row 30: using MC, p
Row 31: Change to A, (slip 1 purlwise, k1)
Row 32: (p1, yb, slip 1 purlwise, yf)
Row 33: Change to B, k
Row 34: p2tog, p to last 2 sts, p2tog
Next: rep rows 11 to 17
Right Cuff:
Using MC, change to 3 mm needles.
Row 1: p3, (p2tog, p5) 3 times (21 sts)
Row 2: (k1, p1) rib to end
Row 3: (p1, k1) rib to end
Repeat Row 2 and 3 once more.
Cast off in rib.
Left Sleeve:
Row 1: Using A and 3.25 mm needles, with RS facing, pick up and k4 sts, k20 sts from st holder, pick up and k4 sts
Row 2: p
Row 3: Change to B, (k1, sl 1 purlwise) rep to end
Row 4: (yb, sl 1 purlwise, yf, p1) rep to end
Row 5: Change to MC, k
Row 6: p
Row 7: Change to A, (sl 1 purlwise, k1) rep to end
Row 8: (p1, yb, sl 1 purlwise, yf) rep to end
Row 9: Change to B, k
Row 10: p
Row 11: Change to MC, (k1, sl 1 purlwise) rep to end
Row 12: (yb, sl 1 purlwise, yf, p1) rep to end
Row 13: Change to A, k
Row 14: p
Row 15: Change to B, (sl 1 purlwise, k1) rep to end
Row 16: (p1, yb, sl 1 purlwise, yf) rep to end
Row 17: Change to MC, k
Row 18: p2tog, p to last 2 sts, p2tog
Next: rep rows 7 to 17
Row 30: Using MC, p
Row 31: Change to A, (k1, sl 1 purlwise) rep to end
Row 32: (yb, sl 1 purlwise, yf, p1) rep to end
Row 33: Change to B, k
Row 34: p2tog, p to last 2 sts, p2tog
Next: rep rows 11 to 17
Left Cuff:
Using MC, change to 3 mm needles
Row 1: (p5, p2tog) 3 times, p3
Row 2: (k1, p1) rib to end
Row 3: (p1, k1) rib to end
Repeat row 2 and 3 once more
Cast off in rib.
To finish:
Sew in all loose ends. Join sleeve and side seams.
Washing instructions:
Gently wash the sweater in luke warm water with a little woolite. Do not rub or wring the sweater or the wool may felt. Rinse well with luke warm water to remove all the detergent. Place sweater inside a towel and squeeze out the excess water. Shape and leave to dry flat.