1. Импорт пользователей из файла Users.csv
mount /dev/sr0 /mnt
nano import.sh
- ВСТАВЛЯЕМ:
#!/bin/bash
tail -n +2 /mnt/Users.csv | while IFS=';' read -r firstName lastName _ _ ou _ _ _ _ password
do
samba-tool ou create "OU=$ou"
samba-tool user create "${firstName}${lastName}" "P@ssw0rd1" \
--userou="OU=$ou"
done
- Выдаём права на исполнение:
chmod +x import.sh
./import.sh
- На HQ-CLI попробовать зайти по данным:
Логин: MalachiAlexander@au-team.irpo
Пароль: P@ssw0rd1
2. СЕРТИФИКАТЫ; HQ-SRV:
dnf install openssl-gost-engine
openssl-switch-config gost
update-crypto-policies --set GOST-ONLY:GOST
openssl genpkey -algorithm gost2012_256 -pkeyopt paramset:A -out CA.key
openssl req -new -x509 -md_gost12_256 -days 365 -key CA.key -out CA.crt -subj "/C=RU/ST=Russia/L=Kazan/O=MCK-KTITS/OU=MCK-KTITS CA/CN=MCK-KTITS CA Root"
openssl genpkey -algorithm gost2012_256 -pkeyopt paramset:A -out au-team.irpo.key
nano au-team.irpo.ext
- ВСТАВЛЯЕМ В ФАЙЛ РАСШИРЕНИЙ:
authorityKeyIdentifier=keyid,issuer
basicConstraints=CA:FALSE
keyUsage = digitalSignature, nonRepudiation, keyEncipherment, dataEncipherment
subjectAltName = @alt_names
[alt_names]
DNS.1 = au-team.irpo
DNS.2 = docker.au-team.irpo
DNS.3 = web.au-team.irpo
IP.1 = 172.16.1.2
IP.2 = 172.16.2.2
- СОХРАНЯЕМ!
openssl req -new -md_gost12_256 -key au-team.irpo.key -out au-team.irpo.csr -subj "/C=RU/L=Kazan/O=AU-TEAM Site GOST/CN=*.au-team.irpo"
openssl x509 -req -in au-team.irpo.csr -CA CA.crt -CAkey CA.key -CAcreateserial -out au-team.irpo.crt -days 30 -extfile au-team.irpo.ext
cat au-team.irpo.crt CA.crt > fullchain.crt
openssl-switch-config default
update-crypto-policies --set DEFAULT
- ПОДГОТОВКА ПЕРЕНОСА:
mkdir -p /home/sshuser/certs
cp fullchain.crt /home/sshuser/certs
cp au-team.irpo.key /home/sshuser/certs
cp CA.crt /home/sshuser/certs
chmod 755 -R /home/sshuser/certs
- НАСТРОЙКА НА ISP:
dnf install openssl-gost-engine
openssl-switch-config gost
update-crypto-policies --set GOST-ONLY:GOST
mkdir -p /etc/ssl/site
scp -P 2026 sshuser@172.16.1.2:/home/sshuser/certs/* /etc/ssl/site
- Вводим пароль: P@ssw0rd
- РЕДАКТИРУЕМ ФАЙЛ /etc/nginx/nginx.conf
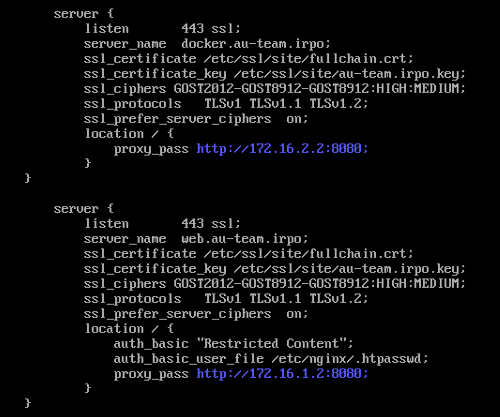
server {
listen 443 ssl;
server_name docker.au-team.irpo;
ssl_certificate /etc/ssl/site/fullchain.crt;
ssl_certificate_key /etc/ssl/site/au-team.irpo.key;
ssl_ciphers GOST2012-GOST8912-GOST8912:HIGH:MEDIUM;
ssl_protocols TLSv1 TLSv1.1 TLSv1.2;
ssl_prefer_server_ciphers on;
location / {
proxy_pass http://172.16.2.2:8080;
}
}
server {
listen 443 ssl;
server_name web.au-team.irpo;
ssl_certificate /etc/ssl/site/fullchain.crt;
ssl_certificate_key /etc/ssl/site/au-team.irpo.key;
ssl_ciphers GOST2012-GOST8912-GOST8912:HIGH:MEDIUM;
ssl_protocols TLSv1 TLSv1.1 TLSv1.2;
ssl_prefer_server_ciphers on;
location / {
auth_basic "Restricted Content";
auth_basic_user_file /etc/nginx/.htpasswd;
proxy_pass http://172.16.1.2:8080;
}
}
- СОХРАНЯЕМ и проверяем: nginx -t
systemctl restart nginx
- НАСТРОЙКА НА HQ-CLI:
mount /dev/cdrom /mnt
cp -r /mnt/cryptopro/linux-amd64/ .
scp -P 2026 sshuser@192.168.100.2:/home/sshuser/certs/CA.crt /home/username
- ПАРОЛЬ: P@ssw0rd
chmod +x linux-amd64/*.sh
./linux-amd64/install_gui.sh
- ГРАФИКА В РАБОЧЕЙ ТЕТРАДИ!
3. strongswan HQ-RTR И BR-RTR:
dnf install strongswan -y
systemctl enable --now strongswan
nano /etc/strongswan/swanctl/conf.d/swanctl.conf
- КОНФИГ ДЛЯ HQ-RTR:
connections {
my-tunnel {
local_addrs = 172.16.1.2
remote_addrs = 172.16.2.2
local {
auth = psk
}
remote {
auth = psk
}
children {
net {
mode = transport
esp_proposals = aes256-sha256
}
}
}
}
secrets {
ike-1 {
secret = "P@ssw0rd"
}
}
- СОХРАНЯЕМ! КОНФИГ ДЛЯ BR-RTR:
connections {
my-tunnel {
local_addrs = 172.16.2.2
remote_addrs = 172.16.1.2
local {
auth = psk
}
remote {
auth = psk
}
children {
net {
mode = transport
esp_proposals = aes256-sha256
}
}
}
}
secrets {
ike-1 {
secret = "P@ssw0rd"
}
}
- СОХРАНЯЕМ и ПЕРЕЗАПУСКАЕМ: systemctl restart strongswan
НА HQ-RTR: swanctl --initiate --child net
НА HQ-RTR: swanctl --list-conns
НА HQ-RTR: tcpdump -i ens33 -n host 172.16.2.2
4. Настройка Firewalld HQ-RTR:
firewall-cmd --permanent --zone=external --change-interface=ens33
firewall-cmd --permanent --zone=internal --change-interface=ens34
firewall-cmd --permanent --zone=internal --change-interface=ens34.100
firewall-cmd --permanent --zone=internal --change-interface=ens34.200
firewall-cmd --permanent --zone=internal --add-interface=tun0
firewall-cmd --permanent --new-policy int-to-ext
firewall-cmd --permanent --policy int-to-ext --add-ingress-zone=internal
firewall-cmd --permanent --policy int-to-ext --add-egress-zone=external
firewall-cmd --permanent --policy int-to-ext --set-target=ACCEPT
firewall-cmd --permanent --zone=external --add-service=http
firewall-cmd --permanent --zone=external --add-service=https
firewall-cmd --permanent --zone=external --add-service=dns
firewall-cmd --permanent --zone=external --add-service=ntp
firewall-cmd --permanent --zone=external --add-port=2026/tcp
firewall-cmd --permanent --zone=external --add-port=8080/tcp
firewall-cmd --permanent --zone=external --add-protocol=gre
firewall-cmd --permanent --zone=external --add-port=500/udp
firewall-cmd --permanent --zone=external --add-port=4500/udp
firewall-cmd --permanent --zone=external --add-protocol=esp
firewall-cmd --permanent --zone=external --add-protocol=ah
firewall-cmd --permanent --zone=internal --add-protocol=ospf
firewall-cmd --permanent --zone=external --add-forward-port=port=2026:proto=tcp:toport=2026:toaddr=192.168.100.2
firewall-cmd --permanent --zone=external --add-forward-port=port=8080:proto=tcp:toport=80:toaddr=192.168.100.2
firewall-cmd --permanent --direct --add-passthrough ipv4 -t mangle -A FORWARD -p tcp --tcp-flags SYN,RST SYN -j TCPMSS --clamp-mss-to-pmtu
firewall-cmd --reload
- КОНФИГУРАЦИЯ ДЛЯ BR-RTR:
firewall-cmd --permanent --zone=external --change-interface=ens33
firewall-cmd --permanent --zone=internal --change-interface=ens34
firewall-cmd --permanent --zone=internal --add-interface=tun0
firewall-cmd --permanent --new-policy int-to-ext
firewall-cmd --permanent --policy int-to-ext --add-ingress-zone=internal
firewall-cmd --permanent --policy int-to-ext --add-egress-zone=external
firewall-cmd --permanent --policy int-to-ext --set-target=ACCEPT
firewall-cmd --permanent --zone=external --add-service=http
firewall-cmd --permanent --zone=external --add-service=https
firewall-cmd --permanent --zone=external --add-service=dns
firewall-cmd --permanent --zone=external --add-service=ntp
firewall-cmd --permanent --zone=external --add-port=2026/tcp
firewall-cmd --permanent --zone=external --add-port=8080/tcp
firewall-cmd --permanent --zone=external --add-protocol=gre
firewall-cmd --permanent --zone=external --add-port=500/udp
firewall-cmd --permanent --zone=external --add-port=4500/udp
firewall-cmd --permanent --zone=external --add-protocol=esp
firewall-cmd --permanent --zone=external --add-protocol=ah
firewall-cmd --permanent --zone=internal --add-protocol=ospf
firewall-cmd --permanent --zone=external --add-forward-port=port=2026:proto=tcp:toport=2026:toaddr=172.30.100.2
firewall-cmd --permanent --zone=external --add-forward-port=port=8080:proto=tcp:toport=8080:toaddr=172.30.100.2
firewall-cmd --permanent --direct --add-passthrough ipv4 -t mangle -A FORWARD -p tcp --tcp-flags SYN,RST SYN -j TCPMSS --clamp-mss-to-pmtu
firewall-cmd --reload
5. Настройка ПРИНТ-сервера на HQ-SRV:
dnf install cups cups-pdf -y –nogpgcheck
systemctl enable –-now cups
nano /etc/cups/cupsd.conf
ВМЕСТО: Listen localhost:631
СТАВИМ: Listen *:631
В <Location /> пишем Allow all
В <Location /admin> пишем Allow all
- СОХРАНЯЕМ и ПЕРЕЗАПУСКАЕМ: systemctl restart cups
lpadmin -x Virtual_PDF
lpadmin -m | grep -i pdf
lpadmin -p PDF -E -v cups-pdf:/ -m "CUPS-PDF_noopt.ppd"
- ДОБАВЛЕНИЕ ПРИНТЕРА В РАБОЧЕЙ ТЕТРАДИ!
6. Логирование rsyslog, сервер HQ-SRV:
nano /etc/rsyslog.conf
Раскомментировать строки module... И input...
В КОНЦЕ ДОБАВЛЯЕМ:
$template RemoteLogs,"/opt/%HOSTNAME%/%HOSTNAME%.log"
if $hostname != 'hq-srv' then {
*.warning ?RemoteLogs
& stop
}
- НА HQ-RTR, BR-RTR, BR-SRV редактируем:
nano /etc/rsyslog.conf
ДОБАВЛЯЕМ: *.warning @192.168.100.2:514
- ВЕЗДЕ ПЕРЕЗАПУСКАЕМ СЛУЖБУ: systemctl restart rsyslog
- НАСТРОЙКА НА HQ-SRV:
nano /etc/logrotate.d/remote_logs
- ВСТАВЛЯЕМ
/opt/*/*.log {
weekly
rotate 4
compress
minsize 10M
missingok
notifempty
sharedscripts
postrotate
/usr/bin/systemctl kill -s HUP rsyslog.service >/dev/null 2>&1 || true
endscript
}
- ВЕЗДЕ ПЕРЕЗАПУСКАЕМ СЛУЖБУ: systemctl restart logrotate
7. Мониторинг на HQ-SRV:
dnf install -y grafana prometheus prometheus-node_exporter –nogpgcheck
nano /etc/prometheus/prometheus.yml
- ВМЕСТО static_configs:
static_configs:
- targets: ['localhost:9090','192.168.100.2:9100','172.30.100.2:9100']
labels:
app: "prometheus"
- СОХРАНЯЕМ и ПЕРЕЗАПУСКАЕМ:
systemctl enable --now grafana-server
systemctl enable --now prometheus
systemctl enable --now node_exporter
- NODE_EXPORTER на BR-SRV:
dnf install -y prometheus-node_exporter
systemctl enable --now node_exporter
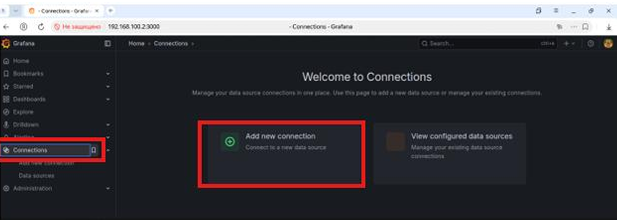
- ГРАФИЧЕСКАЯ НАСТРОЙКА НА РАБОЧЕЙ ТЕТРАДИ. САЙТ: http://192.168.100.2:3000
- DNS НА HQ-SRV:
nano /opt/dns/au-team.irpo
ДОБАВЛЯЕМ: mon A 192.168.100.2
СОХРАНЯЕМ И ПЕРЕЗАПУСКАЕМ: systemctl restart named
8. Инвентаризация на BR-SRV:
mount /dev/cdrom /mnt
cp /mnt/playbook/get_hostname_address.yml /etc/ansible
nano /etc/ansible/demo.ini
- ВСТАВЛЯЕМ В КОНЕЦ:
[inventory]
hq-cli ansible_host=192.168.200.2 ansible_user=username
hq-srv ansible_host=192.168.100.2 ansible_port=2026 ansible_user=sshuser
- СОХРАНЯЕМ И РЕДАКТИРУЕМ /etc/ansible/get_hostname_address.yml
- name: Inventory of HQ-SRV and HQ-CLI
hosts: inventory
gather_facts: yes
tasks:
- name: получение данных с хоста
copy:
dest: /etc/ansible/PC-INFO/{{ ansible_hostname }}.yml
content: |
Hostname: {{ ansible_hostname }}
IP_Address: {{ ansible_default_ipv4.address }}
delegate_to: localhost
- СОХРАНЯЕМ
mkdir -p /etc/ansible/PC-INFO
cd /etc/ansible
ansible-playbook get_hostname_address.yml -i demo.ini
ls /etc/ansible/PC-INFO
- ДОЛЖНЫ БЫТЬ ФАЙЛЫ hq-cli.yml и hq-srv.yml с правильными IP адресами!
9. Fail2ban на HQ-SRV:
dnf install fail2ban -y --nogpgcheck
nano /etc/fail2ban/jail.local
- ВСТАВЛЯЕМ
[sshd]
enabled = true
port = 2026
filter = sshd
maxretry = 3
bantime = 60
findtime = 120
- СОХРАНЯЕМ и ПЕРЕЗАПУСКАЕМ:
systemctl restart fail2ban
systemctl enable --now fail2ban
- ПРОВЕРКА: вводим не правильно пароль 3 раза при попытке входа через ssh в HQ-SRV и наблюдаем бан командой: fail2ban-client status sshd