В этом уроке мы создадим приложение, где будут находиться все уроки.
Создание проекта находиться в этом уроке https://innatomeya.ru/2022/11/16/знакомство-с-android-studio/ , поэтому не буду расписывать и указывать как создавать виртуальное оборудование и сразу перейду к нашей теме.
Создадим в нашем проекте класс Lessons.java где будут находиться наши уроки. Для его создания выполните следующее в папке
Создаем нужный файл
В нем пропишем следующий код
package com.example.innatomeya;
public class Lessons {
private String name;
private String description;
private int imageResourceId;
public static final Lessons[] lessons = {
new Lessons("Работа со светодиодом","https://innatomeya.ru/2022/03/29/работа-со-светодиодом/",R.drawable.e),
new Lessons("Работа с кнопкой","https://innatomeya.ru/2022/04/05/работа-с-кнопкой/",R.drawable.q),
new Lessons("Работа с UART(Общение между STM32F030 и PC)","https://innatomeya.ru/2022/04/06/работа-с-uartобщение-между-stm32f030-и-pc/",R.drawable.w)
};
private Lessons(String name, String description, int imageResourceId){
this.name = name;
this.description= description;
this.imageResourceId = imageResourceId;
}
public String getDescription(){
return description;
}
public String getName(){
return name;
}
public int getImageResourceId(){
return imageResourceId;
}
public String toString(){
return this.name;
}
}
Где package com.example.innatomeya; - создаётся автоматически
private String name;- поле имени
private String description;- поле описания
private int imageResourceId;- поле изображения
R.drawable.q- наше изображение которое будет выводиться в уроках
private Lessons(String name, String description, int imageResourceId){
this.name = name;
this.description= description;
this.imageResourceId = imageResourceId;
} - у каждой лекции свое название, содержание и картинка
Как разместить свои изображения, для этого в папке drawable по пути InnaTomeya\app\src\main\res\drawable просто вставьте их
Что бы разместить свой логотип в приложении, сделайте следующее в папке drawable разместите изображение логотипа, в файле strings.xml
пропишите следующий код
<string name="logo">logo</string>
<string-array name="options">
<item>Lessons</item>
<item>Android</item>
</string-array>
Где <string name="logo">logo</string> - логотип
<string-array name="options">
<item>Lessons</item>
<item>Android</item>
</string-array> - массив для вывода списка
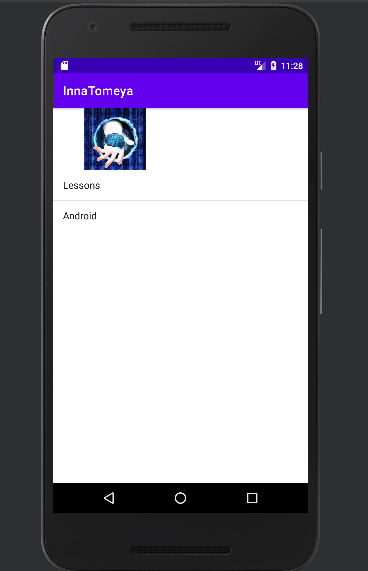
В файле activity_main.xml пишем код
<?xml version="1.0" encoding="utf-8"?>
<LinearLayout xmlns:android="http://schemas.android.com/apk/res/android"
xmlns:app="http://schemas.android.com/apk/res-auto"
xmlns:tools="http://schemas.android.com/tools"
android:layout_width="match_parent"
android:layout_height="match_parent"
android:orientation="vertical"
tools:context=".MainActivity">
<ImageView
android:layout_width="200dp"
android:layout_height="100dp"
android:src="@drawable/logo"
android:contentDescription="@string/logo"/>
<ListView
android:layout_width="match_parent"
android:layout_height="wrap_content"
android:id="@+id/list_options"
android:entries="@array/options"/>
</LinearLayout>
Где android:orientation="vertical" – макет с вертикальной ориентацией ( под логотипом отобразиться наш список)
<ImageView
android:layout_width="200dp"
android:layout_height="100dp"
android:src="@drawable/logo"
android:contentDescription="@string/logo"/>-прописаны размеры изображения, а так же папка в которой лежит логотип и его имя
<ListView
android:layout_width="match_parent"
android:layout_height="wrap_content"
android:id="@+id/list_options"
android:entries="@array/options"/>-выводит наш список
Переходим в файл MainActivity.java
package com.example.innatomeya;
import androidx.appcompat.app.AppCompatActivity;
import android.os.Bundle;
import android.content.Intent;
import android.widget.AdapterView;
import android.widget.ListView;
import android.view.View;
public class MainActivity extends AppCompatActivity {
@Override
protected void onCreate(Bundle savedInstanceState) {
super.onCreate(savedInstanceState);
setContentView(R.layout.activity_main);
AdapterView.OnItemClickListener itemClickListener = new AdapterView.OnItemClickListener() {
@Override
public void onItemClick(AdapterView<?> listView, View itemView, int position, long id) {
if (position == 0) {
Intent intent = new Intent(MainActivity.this, LessonsCategoryActivity.class);
startActivity(intent);
}
}
};
ListView listView = (ListView) findViewById(R.id.list_options);
listView.setOnItemClickListener(itemClickListener);
}
}
Где import android.content.Intent;
import android.widget.AdapterView;
import android.widget.ListView;
import android.view.View; - прописываем внешние классы для их использования
AdapterView.OnItemClickListener itemClickListener = new AdapterView.OnItemClickListener() –создание объекта для уведомления события
public void onItemClick- обеспечивает получение сведений что пользователь нажал на наш список
LessonsCategoryActivity.class-запускаем LessonsCategoryActivity.class если пользователь нажал на вариант из списка
listView.setOnItemClickListener(itemClickListener); - добавляем объект к списку
Сейчас нам нужно создать LessonsCategoryActivity в папке java
Для этого
Нажимаем финиш и пишем в файл activity_lessons_category.xml следующий код
<?xml version="1.0" encoding="utf-8"?>
<LinearLayout xmlns:android="http://schemas.android.com/apk/res/android"
xmlns:app="http://schemas.android.com/apk/res-auto"
xmlns:tools="http://schemas.android.com/tools"
android:layout_width="match_parent"
android:layout_height="match_parent"
android:orientation="vertical"
tools:context=".LessonsCategoryActivity">
<ListView
android:layout_width="match_parent"
android:layout_height="wrap_content"
android:id="@+id/list_lessons"/>
</LinearLayout>
Данная активность используется для вывода списка, когда мы выберем урок, то на экране появиться сам урок
В файле LessonsCategoryActivity.java
package com.example.innatomeya;
import androidx.appcompat.app.AppCompatActivity;
import android.os.Bundle;
import android.widget.ArrayAdapter;
import android.widget.ListView;
import android.view.View;
import android.content.Intent;
import android.widget.AdapterView;
public class LessonsCategoryActivity extends AppCompatActivity {
@Override
protected void onCreate(Bundle savedInstanceState) {
super.onCreate(savedInstanceState);
setContentView(R.layout.activity_lessons_category);
ArrayAdapter<Lessons> listAdapter = new ArrayAdapter<>(
this, android.R.layout.simple_list_item_1,Lessons.lessons);
ListView listLessons = (ListView) findViewById(R.id.list_lessons);
listLessons.setAdapter(listAdapter);
AdapterView.OnItemClickListener itemClickListener = new AdapterView.OnItemClickListener() {
@Override
public void onItemClick(AdapterView<?> listLessons, View itemView, int position, long id) {
Intent intent = new Intent(LessonsCategoryActivity.this,LesonsActivity.class);
intent.putExtra(LesonsActivity.EXTRA_LESSONS,(int) id);
startActivity(intent);
}
};
listLessons.setOnItemClickListener(itemClickListener);
}
}
Где import android.widget.ArrayAdapter;
import android.widget.ListView;
import android.view.View;
import android.content.Intent;
import android.widget.AdapterView; - импортируем нужные нам классы
ArrayAdapter<Lessons> listAdapter = new ArrayAdapter<>(
this, android.R.layout.simple_list_item_1,Lessons.lessons);
ListView listLessons = (ListView) findViewById(R.id.list_lessons);
listLessons.setAdapter(listAdapter);-представление списка из массива lessons
AdapterView.OnItemClickListener itemClickListener = new AdapterView.OnItemClickListener()- создание объекта для “чтения” нажатий
onItemClick-вызывается при щелчке на вариант из списка
Intent intent = new Intent(LessonsCategoryActivity.this,LesonsActivity.class);
intent.putExtra(LesonsActivity.EXTRA_LESSONS,(int) id);
startActivity(intent);-когда мы нажимаем на урок то его идентификатор передается запускаемой активности LesonsActivity
И последнее что нам нужно создать LesonsActivity в папке java
Для этого
Нажимаем на финиш и пишем код в файле activity_lesons.xml
<?xml version="1.0" encoding="utf-8"?>
<LinearLayout xmlns:android="http://schemas.android.com/apk/res/android"
xmlns:app="http://schemas.android.com/apk/res-auto"
xmlns:tools="http://schemas.android.com/tools"
android:layout_width="match_parent"
android:layout_height="match_parent"
android:orientation="vertical"
tools:context=".LesonsActivity">
<ImageView
android:layout_width="190dp"
android:layout_height="190dp"
android:id="@+id/photo"/>
<TextView
android:layout_width="wrap_content"
android:layout_height="wrap_content"
android:id="@+id/name"/>
<TextView
android:layout_width="match_parent"
android:layout_height="wrap_content"
android:id="@+id/description"/>
</LinearLayout>
Тут задаем информацию для вывода урока (где располагается картинка, название и содержание урока)
В файле LesonsActivity.java пишем
package com.example.innatomeya;
import androidx.appcompat.app.AppCompatActivity;
import android.os.Bundle;
import android.widget.ImageView;
import android.widget.TextView;
public class LesonsActivity extends AppCompatActivity {
public static final String EXTRA_LESSONS = "lessonsId";
@Override
protected void onCreate(Bundle savedInstanceState) {
super.onCreate(savedInstanceState);
setContentView(R.layout.activity_lesons);
int lessonsId = (Integer)getIntent().getExtras().get(EXTRA_LESSONS);
Lessons lessons = Lessons.lessons[lessonsId];
TextView name = (TextView) findViewById(R.id.name);
name.setText(lessons.getName());
TextView description = (TextView) findViewById(R.id.description);
description.setText(lessons.getDescription());
ImageView photo = (ImageView) findViewById(R.id.photo);
photo.setImageResource(lessons.getImageResourceId());
photo.setContentDescription(lessons.getName());
}
}
Где [lessonsId]-используется для получения подробной информации о уроке, выбранном нами
TextView name = (TextView) findViewById(R.id.name);
name.setText(lessons.getName());
TextView description = (TextView) findViewById(R.id.description);
description.setText(lessons.getDescription());
ImageView photo = (ImageView) findViewById(R.id.photo);
photo.setImageResource(lessons.getImageResourceId());
photo.setContentDescription(lessons.getName());- заполняем данными уроков
В Telegram канале находятся проекты