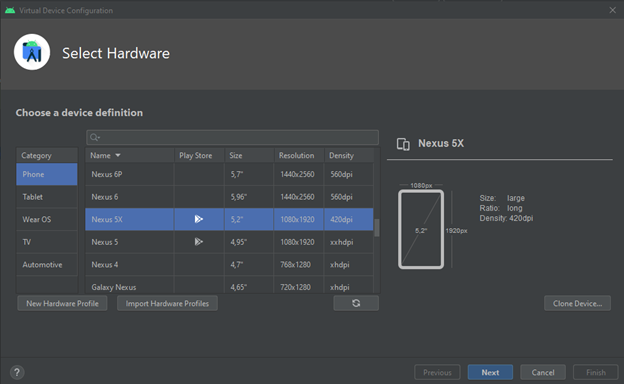
Создадим устройство
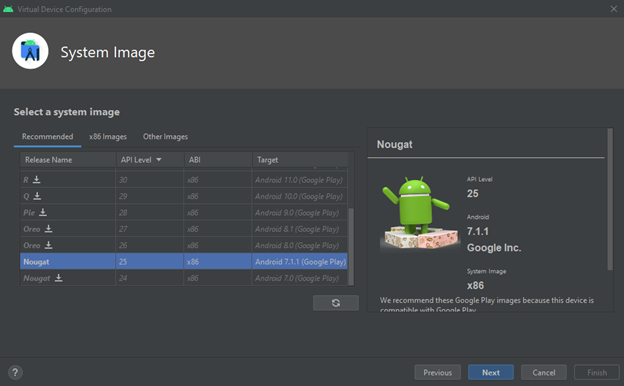
Выбираем образ системы
Запускаем наш эмулятор, он очень долго стартует
Запустим наше приложение (долгий первый запуск из-за установок)
Все работает, продолжаем писать наше приложение
Добавляем кнопку, для этого возвращаемся в визуальный редактор
Переходим в редактор кода, код добавленный редактором нового элемента зависит от того как вы его размещаете
Добавим раскрывающийся список (каждый раз привожу пример полного кода, а не фрагмента)
<LinearLayout
xmlns:android="http://schemas.android.com/apk/res/android"
xmlns:app="http://schemas.android.com/apk/res-auto"
xmlns:tools="http://schemas.android.com/tools"
android:layout_width="match_parent"
android:layout_height="match_parent"
android:padding="18dp"
android:orientation="vertical"
tools:context=".MainActivity">
<Spinner
android:id="@+id/color"
android:layout_width="wrap_content"
android:layout_height="wrap_content"
android:layout_marginTop="40dp"
android:layout_gravity="center"
android:layout_margin="18dp"/>
<Button
android:id="@+id/find_1"
android:layout_width="wrap_content"
android:layout_height="wrap_content"
android:layout_gravity="center"
android:layout_margin="18dp"
android:text="Button" />
<TextView
android:id="@+id/textView"
android:layout_width="wrap_content"
android:layout_height="wrap_content"
android:layout_gravity="center"
android:layout_margin="18dp"
android:text="Test"
/>
</LinearLayout>
Проверяем результат
Создадим стоковые ресурсы по пути
<resources>
<string name="app_name">Test</string>
<string name="find_1">Нажмите чтобы получить ссылку</string>
<string name="find_2">Лайкните, подпишитесь или прокоментируйте пожалуйста</string>
</resources>
Переходим в файл activity_main.xml
<LinearLayout
xmlns:android="http://schemas.android.com/apk/res/android"
xmlns:app="http://schemas.android.com/apk/res-auto"
xmlns:tools="http://schemas.android.com/tools"
android:layout_width="match_parent"
android:layout_height="match_parent"
android:padding="18dp"
android:orientation="vertical"
tools:context=".MainActivity">
<Spinner
android:id="@+id/color"
android:layout_width="wrap_content"
android:layout_height="wrap_content"
android:layout_marginTop="40dp"
android:layout_gravity="center"
android:layout_margin="18dp"/>
<Button
android:id="@+id/find_1"
android:layout_width="wrap_content"
android:layout_height="wrap_content"
android:layout_gravity="center"
android:layout_margin="18dp"
android:text="Button" />
<TextView
android:id="@+id/textView"
android:layout_width="wrap_content"
android:layout_height="wrap_content"
android:layout_gravity="center"
android:layout_margin="18dp"
android:text="@string/find_2"
/>
</LinearLayout>
Добавляем String-array
Добавляем ссылку в activity_main.xml
Проверяем результат
Доработаем кнопку в файле MainActivity.java путь до файла app\src\main\java\InnaTomeya.ru пишем код, но для начала создадим класс java, имя присвоим findExpert.java отображения текста которого мы хотим видеть по нажатию кнопки
package InnaTomeya.ru;
import java.util.ArrayList;
import java.util.List;
public class findExpert {
List<String> getFind_2 (String color){
List<String> find_2 = new ArrayList<>();
if(color.equals("Telegram")){
find_2.add("https://t.me/innatomeya_STM32_Linux");
}
else {
find_2.add("https://vk.com/innatomeya_stm32_linux");
}
return find_2;
}
}
теперь поработаем с MainActivity.java, для работоспособности кнопки
import android.os.Bundle;
import android.view.View;
import android.widget.Spinner;
import android.widget.TextView;
import java.util.List;
public class MainActivity extends AppCompatActivity {
private findExpert expert = new findExpert();
@Override
protected void onCreate(Bundle savedInstanceState) {
super.onCreate(savedInstanceState);
setContentView(R.layout.activity_main);
}
public void onClickFind1 (View view){
TextView find_2 = (TextView) findViewById(R.id.find_2);
Spinner color = (Spinner) findViewById(R.id.color);
String findType = String.valueOf(color.getSelectedItem());
List<String> find_2List = expert.getFind_2(findType);
StringBuilder find_2Formatted = new StringBuilder();
for (String find : find_2List){
find_2Formatted.append(find) .append('\n');
}
find_2.setText(find_2Formatted);
}
}
где 1. List<String> find_2List = expert.getFind_2(findType); - Получить контейнер с видами соцсетей
2. StringBuilder find_2Formatted = new StringBuilder(); - Строим String по данным List
3. find_2Formatted.append(find) .append('\n'); - каждая соцсеть выводиться с новой строки
4. find_2.setText(find_2Formatted); - выводим результат
Еще раз полная и окончательная версия activity_main.xml (пожалуйста проверьте свой код и сверьте с моим)
<?xml version="1.0" encoding="utf-8"?>
<LinearLayout
xmlns:android="http://schemas.android.com/apk/res/android"
xmlns:app="http://schemas.android.com/apk/res-auto"
xmlns:tools="http://schemas.android.com/tools"
android:layout_width="match_parent"
android:layout_height="match_parent"
android:padding="18dp"
android:orientation="vertical"
tools:context=".MainActivity">
<Spinner
android:id="@+id/color"
android:layout_width="wrap_content"
android:layout_height="wrap_content"
android:layout_marginTop="40dp"
android:layout_gravity="center"
android:layout_margin="18dp"
android:entries="@array/podpiski"/>
<Button
android:id="@+id/find_1"
android:layout_width="wrap_content"
android:layout_height="wrap_content"
android:layout_gravity="center"
android:layout_margin="18dp"
android:text="@string/find_1"
android:onClick="onClickFind1"/>
<TextView
android:id="@+id/find_2"
android:layout_width="wrap_content"
android:layout_height="wrap_content"
android:layout_gravity="center"
android:layout_margin="18dp"
android:text="@string/find_2"
/>
</LinearLayout>
Теперь давайте сделаем apk файл для телефона
И получаем через некоторое время наш установочник по пути Test\app\build\outputs\apk\debug
В Telegram канале находятся проекты