There are several benefits to using PowerPoint games in the classroom.
They provide an opportunity to model an activity or a game (especially with large classes), they can be fun to play, they are easy to create or edit and they don’t require an internet connection.
The Balloon Game
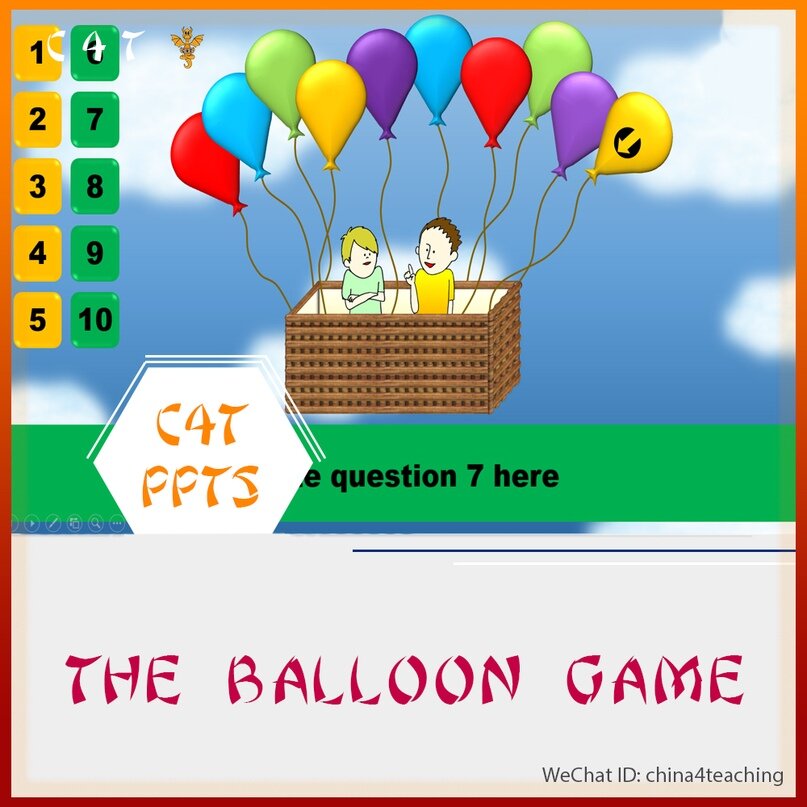
Before your class, download and open the template. You will see a single slide.
Beneath the slide, there are 10 hidden question boxes. 5 yellow questions and 5 green questions. Write a question to go in each box. The yellow questions should be easier than the green questions. If you need more than 10 questions, you can play multiple rounds by copying the slide and writing new questions.
During your class, divide the students into small groups or teams (4-6 students). Allow the students to create a team name for themselves and a ‘buzzer signal’ (raising their hand, showing a sign, ringing a bell, making a funny noise etc.) Although the Balloon Game is played as a team game to keep all the students engaged, it is important to understand the students are working together as a class. If one team wins, the whole class wins.
Start the presentation. Choose a group at random to choose a number from the left-hand side of the screen.
Click on the number and one of your pre-written questions is revealed. Any team can answer but they must use their buzzer. If the students answer correctly, no balloons are lost. If the answer is incorrect, click on a balloon and it will float away. (For an incorrect yellow question, one balloon floats away. For an incorrect green question, two balloons float away.) The first team to answer correctly may choose the next question.
The students may win a reward (at the teacher’s discretion) if there are balloons remaining at the end of the game.
Finger Twister
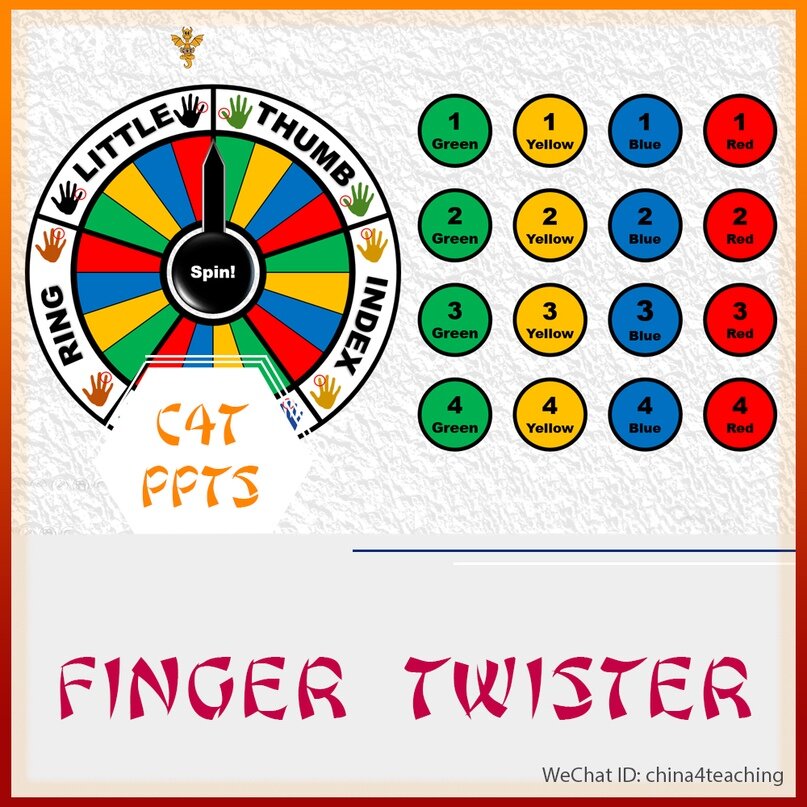
‘Finger Twister‘ is a great game and it is easy to adapt and use in the classroom. Turn the introduction or review of new language into a fun game that the students will enjoy playing.
Before your class, download and open the template.
You will see the menu slide, which contains 16 circles and a spinning wheel. The circles are divided into four categories represented by four colors (green, yellow, blue and red). Clicking on one of the circles will take you to the linked question slide. To start the spinner, click on the spin button in the center and the arrow will rotate quickly. Click again and the arrow will stop.
Each question slide has space for a question, task or challenge to be written. Answers are not provided on the question slide. Feedback must be given by the teacher. Click on the ‘back’ button to return to the menu slide.
You will need to prepare some questions, tasks or challenges the students need to answer or complete before you play the game.
During your class, divide the students into pairs. Each pair will need a ‘Finger Twister’ board. Allow the students to decide which player will go first. The teacher spins the wheel and calls out the finger and the color. The starting player can then choose which circle they will place that finger on (number 1, 2, 3 or 4). Choose one student at random and ask them what number they have chosen. Go to that question slide and present the question, task or challenge to the students. If Student A completes the challenge or answers the question, Student B places their finger on Green 1.
If the first player doesn’t complete the challenge or answers the question incorrectly, they must place their finger on the circle they chose. If the first player completes the challenge or answers the question correctly, the second player must place their finger on the circle they chose. The players take turns until one player is unable to reach a color, if their hand stops touching the paper or if their hand falls.
The player that wins can be given a reward at the teacher’s discretion.
A or B
‘A or B‘ is a game where students are encouraged to discuss and debate, to speculate and guess and to explain the reasons behind their ideas. And if there is disagreement in their groups, students have to learn to persuade their peers.
Before your class, download and open the template.
You will see fives slides. The first slide is the title screen of the game. The second (A is correct) and third slide (B is correct) are for text comparison. Type your statements into the text boxes and write your question at the top of the slide. Ask the students to decide which answer is correct and explain why they chose that answer. The fourth (A is correct) and fifth slide (B is correct) are for picture comparison. Change the picture placeholders to your own image prompts and write your question at the top of the slide. Ask the students to decide which answer is correct and explain why they chose that answer
You will need to prepare some questions for your students before you play the game. Copy and rearrange the different types of question cards you need.
During your class, divide the students into small groups or teams if you have a large class. If you have a small class, students can play as individuals. Allow the students to create a team name for themselves and a ‘buzzer signal’ (raising their hand, showing a sign, ringing a bell, making a funny noise etc.)
Start the presentation and click on the title slide. Read the first question and give the students to talk in their groups and decide which of the answers is correct. After the students have chosen their answer, ask each of the groups their opinion. Once you have spoken to each group, reveal the correct answer to the class. Give a point to each group that guessed correctly. Continue onto the next question.
The team who has scored the most points can be rewarded at the teacher’s discretion.
Target Language
‘Target Language‘ is a quiz format that encourages students to practise and review the vocabulary and grammar of a course.
Before your class, download and open the template.
You will see a title slide, a menu slide and 28 question slides. The menu slide contains twenty-eight numbered targets. Click on one of the targets to go to a question slide. The question slide contains space for your question and space for your answer. Click on the left mouse button or press the left arrow key to reveal your answer. Click the ‘back’ button the return to the menu slide. An arrow will fly from the top-right hand corner and hit the target. The target will disappear to indicate that the question has been answered.
You will need to prepare some questions, tasks or challenges the students need to answer or complete before you play the game.
During your class, divide the students into small groups or teams if you have a large class. If you have a small class, students can play as individuals. Allow the students to create a team name for themselves and a ‘buzzer signal’ (raising their hand, showing a sign, ringing a bell, making a funny noise etc.)
Start the presentation and click on the title slide to go to the menu slide. Ask one of the teams at random to choose one of the twenty-eight targets. Click on the chosen target and you will go to the question slide. Any student or team may answer, but they should use their buzzer signal.
Give the students/team some time to answer the question. You may want to set a time limit. Once the students have answered, click anywhere on the slide to reveal the answer and see if they are correct. If the students are correct, award them a point for their team. Click on the back button to return to the menu slide. The target is hit by a dart and disappears. Repeat until all questions have been answered or until the previously decided time limit is up.
The team who has scored the most points can be rewarded at the teacher’s discretion.
Find the Lie
Before your class, download and open the template.
You will see a title slide and three different question slides. On slide two, A is the correct answer, on slide three, B is the correct answer and on slide four, C is the correct answer. Copy and rearrange the slides as needed. On each of the question slides, write your three statements and make sure your correct statement is in the right textbox. The correct statement will turn green when you click on the textbox during a presentation.
During your class, divide the students into small groups or teams if you have a large class. If you have a small class, students can play as individuals. Allow the students to create a team name for themselves and a ‘buzzer signal’ (raising their hand, showing a sign, ringing a bell, making a funny noise etc.)
Start the presentation and click on the title slide. Introduce the three statements to your students. Invite your students to ask information questions to explore the story behind each of the statements. Then allow your students some time to talk into small groups and decide which statement they think is the lie. Elicit opinions from your students and click on the chosen answer box to reveal whether the statement is true or not. If the students are correct, award them a point for their team. Click on the purple area of the slide or press the left-arrow key to move to the next slide.
The team who has scored the most points/guessed correctly can be rewarded at the teacher’s discretion. After playing the PowerPoint version, the game can be easily transferred to the students to play in small groups.
Star Groups
Before your class, download and open the template.
You will see a title slide and a question slide. The question slide contains a box to write your question. The question should be based on a category. These categories may include word associations, grammar tenses, and phrasal verbs. The slide also contains 12 boxes to write 12 possible answers to the question. Under each of the word boxes there is a marker indicating if the answer is correct or now. If the marker is a star, it indicates the word is correct and belongs in the category. If the marker is a cross, it indicates the word is incorrect and doesn’t belong in the category. Click on a word box during the presentation and it will disappear to reveal the marker beneath. Copy the slide as many times as you need.
You will need to prepare some questions for your students before you play the game.
During your class, divide the students into small groups or teams if you have a large class. If you have a small class, students can play as individuals. Allow the students to create a team name for themselves and a ‘buzzer signal’ (raising their hand, showing a sign, ringing a bell, making a funny noise etc.)
Start the presentation and click on the title slide. Introduce the question to your students. Tell your students that there are 5 correct answers and 7 incorrect answers. Once you have asked the question any student or team may answer, but they should use their buzzer signal.
The first group that chooses to answer, allow them to choose a square. Make sure the students don’t answer in single word responses, they should try and answer in whole sentences. If necessary, provide students with the structure that you want them to use.
Click on the square to determine whether the answer is correct. Each correct answer (star)equals 1 point. If the students guess a correct answer, they can guess again. If they guess an incorrect answer, the question is passed to another team. Remind the students that they are working together as a class and award each team points for the correct answers they gave.
E.g. Team B guess 3 stars but on the fourth guess they find a cross, so the question passes to Team D who gave the final two answers and found the final two stars.
The team who has scored the most points/guessed correctly can be rewarded at the teacher’s discretion.
Quick Match
Quick Match is a simple matching activity, where students match an image to text or text to an image. Just click on the corner with the correct answer.
If you click on the wrong corner, the image will return to the center and the corner will turn red. If you click on the correct corner, the corner will flash green.
This kind of activity is great for learning vocabulary.
Each template contains 4 slides. Each slide has a different corner which is the correct answer. Copy the slides you want into your own presentation.
Note: Don’t delete the images in the template. If you delete the image, you will delete the animations. Instead, right-click on the image and select change picture.
Photo Flash
Press a button to determine how quickly the students see your images.
This kind of activity is great for introducing topics, developing discussions and storytelling.
Open the template and copy the slide into your own presentation.
Note: Don’t delete the images in the template. If you delete the image, you will delete the animations. Instead, right-click on the image and select change picture.
Recall
it is a memory game where the students try to remember a missing word or phrase from a group of words on the screen.
The template contains 3 slides. Each slide represents a different difficulty. Choose between 5, 9 and 12 words.
Choose your level and copy it into your own presentation.
Click on a speech bubble to hide the text. Click on reset to show all the text. Click on hide all to hide all the text.
Picture Reveal
Students are encouraged to guess the picture underneath the square.
Divide the students into teams.
This is a turn based activity. Each team choose a numbered square to reveal.
Once the students have stated their number, they must make a guess or say that they don’t know what the image is. The reason for this rule is to ensure that as much English is spoken as possible.
Anagrammy
When you will open the template, you will see nine squares with letters and word on the right side.
Previously Add word’s letters in these squares randomly.
During class, ask kids to find out the shuffled word.
PPT can be easy edited, if you need more than 5 words, just copy –paste slide.
Mystery Squares
There are 10 coins worth 1 point.
There are 5 coins worth 2 points.
There are 3 coins worth 3 points.
There are 2 coins worth 5 points.
The students don’t know where the higher value coins are, so stronger students won’t dominate the game.
Type a word, grammar structure, or number into each square.
Encourage students to make sentences with words you added.
Encourage students to use the grammar patterns and make a new sentence.
Encourage the students to call out and number and answer the corresponding question.
Note: You can change the placement of the coins, but you will have to adjust the animation triggers. If you move a coin from under square 7 to square 3, you will have to change the animation trigger from square 7 to square 3, otherwise the coin in square 3 will only appear when you click on square 7.
Tic-Tac-Toe
When you open the template, you will see nine numbered squares. You can either play the game with the numbered squares or you can edit those squares and add words or phrases for the students to use in order to claim the square.
Divide your students into two teams. Decide which team is circles and which team is crosses.
Circles go first. One student from the team nominates a number or word. If they produce a sentence or answer a question, the team can claim that square.
Click on the square once to reveal a circle.
Then it’s the crosses turn. If they produce a sentence or answer a question, the team can claim that square.
Click twice on the square to reveal a cross.
The team with three symbols in a row wins.
Click on the ‘play again’ button to reset the board.
Pair Up
The aim of Pair Up is to introduce, practice and test common collocations with students.
This game works well with both large and small classes. It works well with both teams and individual players. Divide your class into suitable numbers.
At the bottom of the slide, there is a hint that tells the students how many matches there are. In the center of the slide, there is a white box that can contains part of the collocation.
If the students choose a word that they think completes the collocation and it is incorrect the box will turn red. If the students choose a correct answer, it will turn green.
BullsEye
The outer ring is worth 1 point.
The middle ring is worth 2 points.
The inner ring is worth 3 points.
The bullseye is worth 5 points.
The value of points should reflect the difficulty of the questions.
However, there are no questions and answers in this template, it is just a way of keep track of points. You will need to create your own questions that reflect the content of your course.
Once you have prepared your questions, start the presentation and you are ready to play.
Divide the students into teams.
Ask one student from the first team to nominate a section of the board.
All students in the class are free to answer the question. How the students respond is up to you, but you could tell the students to use a buzzer, ask them to raise their hands or write the answer on a mini board.
The student who answers the question associated with A3 correctly, they win 3 points for their team.
Click on section A3 and it will change color to yellow.
Quiz Questions
To create your own class quiz, copy the slides you need into a new PowerPoint and write your own questions and answers. When your PowerPoint is ready, you are ready to play.
Divide your students into teams.
All students in the class are free to answer the question. How the students respond is up to you, but you could tell the students to use a buzzer, ask them to raise their hands or write the answer on a mini board.
The student/team who answers the question correctly, wins a point.
Battleships
When you open the template, you will see twenty-eight squares labelled ‘WORD.’ Edit each square and write a word or phrase that you would like the students to use in order to claim the square.
The students choose a square using a letter and number combination e.g. D3, A4, C6. Encourage the students to make a sentence with the word or phrase in that square. If the student is successful, click on the square to reveal whether there is a ship underneath.
You can reward the student or the student’s team with a point if they hit a ship. You can reward the student or the student’s team with several points if they sink the ship. For example, if the ship covers three squares, award the students three points.
Position your ships
Go to the home ribbon
Click on select and choose the selection pane.
Scroll down to the bottom of list and select all the different ships.
Press and hold CTRL as you select the different ships. This will help you select multiple objects.
§ Left-click on your selected objects and drag them to the top of the list in the selection pane.
The ships will appear on top of the board.
Click anywhere in the work space to deselect the ships.
Select one of the ships by left-clicking on it.
Left-click and hold to move your selected ship to a new area of the board.
Left-click and hold on the rotation icon while moving the mouse to rotate the ship to a new alignment.
Once you have positioned all your ships, return to the selection pane.
Press and hold CTRL as you select all the different ships.
Left-click on your selected objects and drag them to the bottom of the list in the selection pane.
Make sure that the ships are above the ‘backboard’ otherwise they won’t be visible when you click on the squares.
The Football Game
When you start the presentation, a soccer ball will appear in the middle of the slide.
Click on each of the green strips of grass to move the ball.
When a player or team scores, click on the team buttons to record the number of goals.
During a real football game, players tackle each other and take control of the ball. An easy way to simulate this is to use a dice. Roll 1/2 and the ball moves one space, roll 3/4 and the ball moves two spaces, roll 5/6 and the ball moves three spaces. This will make it more of a challenge for the students/teams to score a goal. The greater the challenge, the more exciting the game is.
The Football Game is also a very versatile PowerPoint game because it can be used with any set of questions. Additionally, the game can also be transferred easily to the students.
Jeopardy
Jeopardy is a game where the players are given the answer and are asked to form the question, however many ESL quiz games ask a question, so the teacher can judge if the students have understood the material by the answer they have given.
This template can be suitable for both quiz forms. The template is called Jeopardy because of the board layout.
Open the template and you will see the menu board. Each square is linked to a specific slide in the presentation. Click on red 1 and you will move to the red topic and the question that is worth 1 point.
Each question slide has one box for the question and one box for the answer. Add your own questions and answers to the template and you are ready to play.
Start the presentation.
Click on one of the squares on the menu board to go to a question slide.
Click on the question box to reveal the answer.
Click on the answer to return to the menu.
I hope you will enjoy playing Jeopardy.
Concentration
Concentration is a memory game where the students try to remember the location of matching pairs. This activity encourages the students to remember collocations, definitions and meanings.
The template contains 3 slides. Each slide represents a different difficulty. The first uses colors and numbers as a guide to match the cards. The second only uses colors while the third doesn’t use either numbers or colors.
Divide the students into teams.
This is a turn based activity, but all students should be paying attention to try and remember the position of the numbers/colors or cards.
If the students are correct, leave the cards uncovered and award points to their team.
If the students are incorrect, cover the cards again and give the next team a chance.